Note: This article was originally published in 2015. Some steps, commands, or software versions may have changed. Check the current Office 365 documentation for the latest information.
In this step-by-step guide, you’ll learn install office 365 proplus / business on a rds server (terminal server / multipoint server) using shared computer activation - office 2016 version. Microsoft 365 (formerly Office 365) is a cloud-based subscription service offering productivity tools including Exchange Online, SharePoint Online, and Teams.
How to: Install Office 365 ProPlus / Business on a RDS Server (Terminal Server / MultiPoint Server) using Shared Computer Activation - Office 2016 version
For those of you who have read our previous post:(</microsoft/microsoft-online/office-365/how-to-install-office-365-proplus-business-on-a-rds-server-terminal-server-multipoint-server-using-shared-computer-activation/>), you know what this is all about. For those of you that haven’t:
Shared computer activation lets you to deploy Office 365 ProPlus to a computer in your organization that is accessed by multiple users.
Shared computer activation gets enabled during the installation of Office 365 ProPlus, Project Pro for Office 365 and Visio Pro for Office 365 using the Office Deployment Tool. Once enabled, Office installs without being activated. When a user signs in to a computer with Office installed via shared computer activation , Office will check to see if the user has been provisioned for Office 365 ProPlus and temporarily activates Office 365 ProPlus. If a second user signs in to the same computer, the activation does not persist from the first user and process is repeated.
So there you have it. We love shared computer activation as it allows us to deploy Office 365 to Windows Server and Windows MultiPoint Server, allowing us to offer the latest Office experience to our licensed Office 365 users. Not only that, but it does not count against the user’s 5 total installations!
It’s also important to note that deploying Office 365 ProPlus using shared computer activation does not count against a user’s five total installations of Office 365 ProPlus or Office for Mac.
So now that we have tauted the features we like the most, it is time to get to work. From the title you may gather that this installation instructions are meant to be used in connection with an Office 365 subscription and for the deployment of Office 2016. If you would like to deploy Office 2013, please see our previous post referenced on the top of this article as the steps change a little and the Office Deployment Tool referenced here is exclusively for Office 2016.
Here are the steps to deploy Office 365 with Shared Computer Activation.
I. Download the Office 2016 Deployment Tool for Click-to-Run: https://www.microsoft.com/en-us/download/details.aspx?id=49117
II. After downloading the tool, run OfficeDeploymentTool.exe
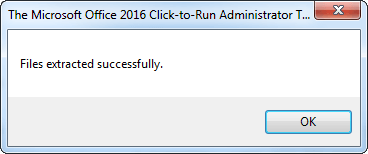
III. Extract the files to a drive on your computer
(http://kx.cloudingenium.com/wp-content/uploads/sites/3/2015/10/7474-21-300x126.png)](http://kx.cloudingenium.com/wp-content/uploads/sites/3/2015/10/7474-21.png)
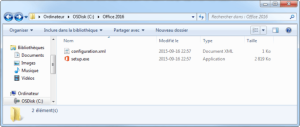
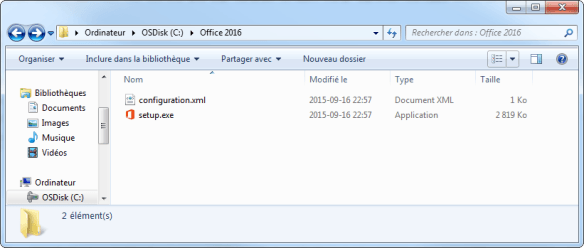
IV. You’ll end up with 2 files (Setup.exe and Configuration.xml)
(http://kx.cloudingenium.com/wp-content/uploads/sites/3/2015/10/7474-31-300x127.png)](http://kx.cloudingenium.com/wp-content/uploads/sites/3/2015/10/7474-31.png)
V. Edit and configure the configuration XML file. I am showing an example below. C hange the SourcePath to your network share. Also, Consider I already added the Small Business Premium Retail Product ID and the Spanish language. This is not necessary. Simply pick from those two product IDs which one you want and then add the languages you wish to install. In my case it was English AND Spanish, so both versions get installed.
VI. From an elevated Command Prompt, run Setup to download the installation files. Please note that there is no GUI / progress bar / etc. to get you know how it is doing. You can check the network share to see if the space used to see if it has have been downloaded or not (at the time of writing it is 1.02gb, could be more or less in the future.)
Setup.exe /download configuration.xml
VII. From an elevated Command Prompt, run Setup to install Office Click-to-Run.
Setup.exe /configure configuration.xml
VIII. You’re done!
I recommend you read more on this topic. Using the Deployment Tool you can also deploy Office 365 / Office 2016 Enterprise Wide using Group Policy in Active Directory, etc.
Update: You can use the following XML which is meant to only active Shared Licensing mode (no extra languages, no network share, no extra office products, etc.) Now you can skip the /download command straight to the /configure command. You will need an internet connection as it will download from the web the installation files to deploy Office365 on the system.
Summary
You’ve successfully learned install office 365 proplus / business on a rds server (terminal server / multipoint server) using shared computer activation - office 2016 version. If you run into any issues, double-check the prerequisites and ensure your Office 365 environment is properly configured.
Related Articles
- [Como: Resolver el error ](/como-resolver-el-error-checkprereqs-configuracion-de-la-relacion-de-la-organizacion-el-identificador-de-organizacion-federada-para-la-confianza-de-federacion-esta-deshabilitado-habilitelo-y-vuelva/)
- Cómo solucionar problemas de cuentas de usuario eliminadas en Office 365
- How to: Connect to a Remote Office 365 Tenant PowerShell Session
- How to: Install Office 365 ProPlus / Business on a RDS Server (Terminal Server / MultiPoint Server) using Shared Computer Activation - Office 2013 version